Partial Heat Emboss

Well hello there! I’m here tonight with a simple, yet elegant card featuring partial heat embossing. There are a couple different ways to achieve this look, but it is actually pretty simple. Today I’m using the Hero Arts Color Layering Orchid stamp set…because it’s beautiful. For my particular card, I used all pigment inks for the stamp, but to be totally honest, it’s probably safer to use a combination of pigment and dye inks. So start out by choosing whatever colors you’d like for your Orchid, using your lightest color first. There are 3 layers, so I used 3 shades of purple (you can always double or triple stamp one color to make it darker if you prefer).

IMG_4283

So like I said, I used all pigment inks and pigment inks take longer to dry than dye inks. So after I stamped the first layer, I gave it some time to dry before stamping the next layer. I used cheap pigment inks, so it actually dried rather quick! At this point, you can test your image to see if it’s dry by sprinkling some embossing powder over it…if nothing sticks, you’re good to go! I went on stamping my second and third layers. I was working a little quicker here so the ink wouldn’t dry before adding the CLEAR embossing powder.The powder did just what I wanted it to…it stuck only to the second and third layers, so I heat set it and die cut each image.

IMG_4282

I positioned the Orchids and stem the way I wanted them on top of a piece of white card stock with a Simon Says Stamp Fog card base. I stamped the “Best Wishes” sentiment from the same stamp set and added some coordinating sequins for an added touch. The card remains fairly clean and simple, and I just love the way it turned out.

IMG_4281

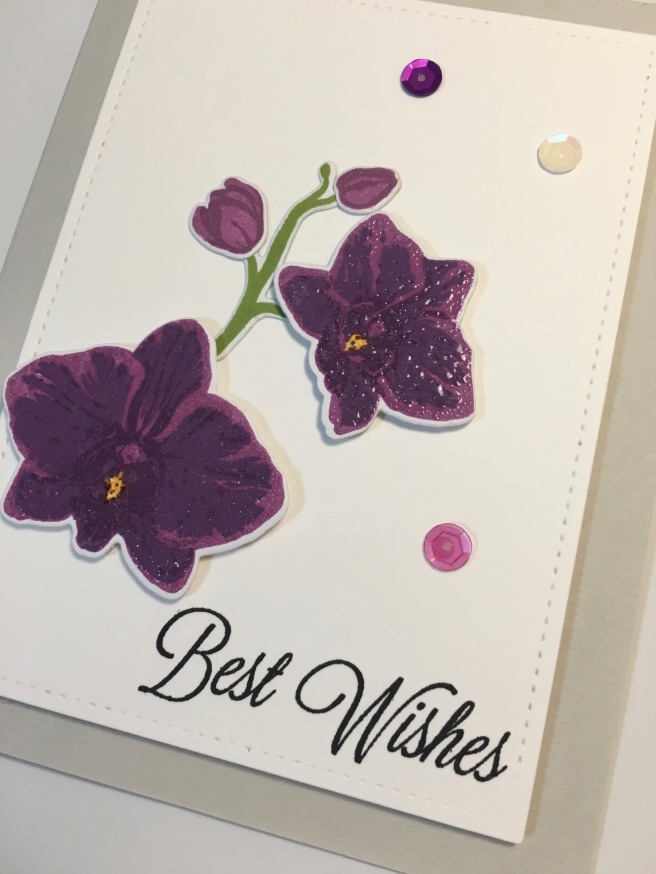
Some alternative options for partial heat embossing are to only use pigment inks for the layer(s) you want heat embossed, or use an embossing pen to color the areas you’d like to heat emboss. You can also double emboss for a thick, smooth finish (if you’ve never tried this, DO IT).

Thanks so much for stopping by, and let me know if you’ve tried this or have any different ways of partial embossing!

Scalloped Frame Shaker Card

Good morning! Today I’m here with a super fun birthday shaker card for all ages (I’m sending this one to my grandmother for her 79th birthday!). I wanted to keep this bright and cheery, and I love using the plaid patterned paper from Lawn Fawn. I also hadn’t used my Lawn Fawn “Party Animal” stamp set in a while, so I wanted to incorporate those as well. So let’s get started!

First, I used the Spellbinders scalloped square dies to cut the plaid frame, as well as the card front and the base. To make the frame, I used the 2 largest dies and lined them up to get a perfect scalloped frame. I used the largest die to cut the inside piece of the shaker and the card base out of some 110 lb Neenah card stock. I then adhered a piece of acetate to the plaid frame and set that aside for later. I stamped all of my pieces onto some card stock and colored them in with Prismacolor colored pencils.

I did some extra work here, thinking it would be a good idea…I cut around the hands of the deer and one hand of the bear to make it look like they are actually holding the items in their hands. But once the card was complete, you didn’t really notice it. Once  had the party animals pieced together, I used the Mama Elephant “Landscape Trio” dies to cut 2 grass pieces and a template for the clouds. For the clouds, I just positioned the template where I wanted it, and added Tumbled Glass Distress Ink above it. Then I moved the template down just a bit to add another layer of clouds. I put the animals in between the layers of grass and stamped the “make a wish” sentiment from the same stamp set.

We are almost done!….I then added a SKINNY double layer of foam tape around the border of the frame on top of the acetate, poured in blue, green and white sequins along with white seed beads, and lined up the card front to the frame. Voila! A shaker card was born! I wanted it to be a top folding card so I just took that last scalloped piece that I cut in the beginning, scored near the top and put glue tape above the score line to adhere to the shaker front. The final card is 4″ by 4″. Now we are done! Hope you enjoy! Feel free to leave any comments or questions for me, and thanks for stopping by!

Mother’s Day Scratch Off

Good evening! Tonight I’m here with a SUPER fun scratch off card. I’m a total sucker for scratch offs, and now that I can make them, I’m hooked. This set is from Inky Antics, and it features a chocolate box, 9 sentiments to add behind the sticker and a chocolate ball with a few different topping options. I enjoyed every second of making this card, and I can’t wait to give it to my future mother-in-law for Mother’s Day!

First, I stamped the chocolate box onto a piece of 110 lb card stock cut just slightly larger than the box (I wanted to use the 110 lb because I wasn’t sure if a lightweight paper could handle the scratching). I made a couple of these cards, and for the first one I made the chocolate box brown, but after adding the chocolate balls, I felt like there was a lot of brown, so I made the box black on my second card. You could also mask around the edge of the box so that only the box is showing, and blend a distress ink to add a little more color. I image searched “box of chocolate” so I could get an idea of what colors they were so I could make them realistic.

DSCF9273

I decided on 3 chocolates and 3 scratch off areas. You could really do as many or as little as you wanted. I stamped my sentiments in the box first and covered them with the scratch off sticker before I stamped the other chocolates. My mind runs wild while I’m crafting and I figured there was a good chance I’d forget, so I thought I’d do it first to get it out of the way. Once that is done, stamp the chocolates in the remaining spaces. Feel free to make it realistic, or just have fun with it. I will say, making this card is easiest with a MISTI, but is still totally achievable without one. After the chocolate box portion is all complete, I added the sentiment to the top, and the scratching instruction to the bottom.  I chose a nice patterned paper to compliment it, and adhered the chocolate box to the paper. I cut an A2 size top-folding card and adhered the pattern paper portion to the card front. I added the final sentiment inside, and attached a penny (for scratching) with Tombow removable adhesive.

DSCF9268

This card was so much fun to make, and I have some other scratch off stamp sets from Inky Antics that I will be creating soon. Since I wasn’t going to scratch the stickers off of these cards because they are gifts, I took a pic of my “tester” card that shows the sticker scratches off just like a normal lotto ticket. Leave me any questions or comments on this card, and have a fabulous Mother’s Day!


DSCF9298DSCF9301DSCF9305DSCF9306DSCF9317

Have a Beary Happy Birthday

Hi everyone! Ashley here with my very first blog and blog post! (So bear with me…get it?) I’ve created a birthday card using the Honey Bears stamp set from The Ton stamps. I stacked up a pile of fish next to one bear, and had the other bear wearing a party hat while holding balloons. I used masking paper to achieve the stacked look for the fish pile, for the party hat to put the bear’s head behind it, and for the fish in the bear’s mouth. I painted everything using the Gansai Tambi watercolor 24 piece set.

I added a tone-on-tone background with the fish, balloons and a polka dot (I’m pretty sure the dot is to add cheek color to the bears, but I used it in the background). Finally, I added a piece of craft foam behind the picture to add some dimension. This card is fairly simple without a whole lot going on, but I think this stamp set is so cute and the bears can be so versatile. I added Wink of Stella clear glitter to the balloons, and blended some Squeezed Lemonade Distress Ink to the edge to add some color. Check it out and leave any questions or comments for me!